
Keep Your Brand Safe With Facebook’s Brand Safety Controls
It’s every marketer’s dream to run ads on the exact websites that your target audience is on. Fortunately, through automated online advertising, you’re able to do exactly that. But (there always has to be a but) while your ads are able to run on these particular websites, it doesn’t mean these websites are ones you always want your brand to be on.
When Nordstrom had ads appearing on Breitbart News, the alt-right website, customers and employees were left confused, with many tweets asking Nordstrom to remove these ads.
These instances may not be the worst thing to ever happen to a brand but they’re definitely not something anyone wants to deal with. And if we can prevent it, sign us up, right?
Facebook does marketers all a big favor with its Brand Safety features. If you don’t want your brand to be associated with a particular publisher for whatever reason, Facebook gives you the control to opt out and prevent ads from appearing on certain sites.
Let’s break down what these Brand Safety features are and how to navigate them.
In your business manager account you’ll find a section dedicated to Brand Safety where you’ll have access to inventory filters and can assign block lists for each ad account. Both of these features help manage where your ads are placed on the Audience Network, in-stream video, and Instant Articles.
To access this section, go to the Business Settings page on your Business Manager. Following the menu the left-hand side, click the drop-down for Brand Safety, from there click on Block Lists.
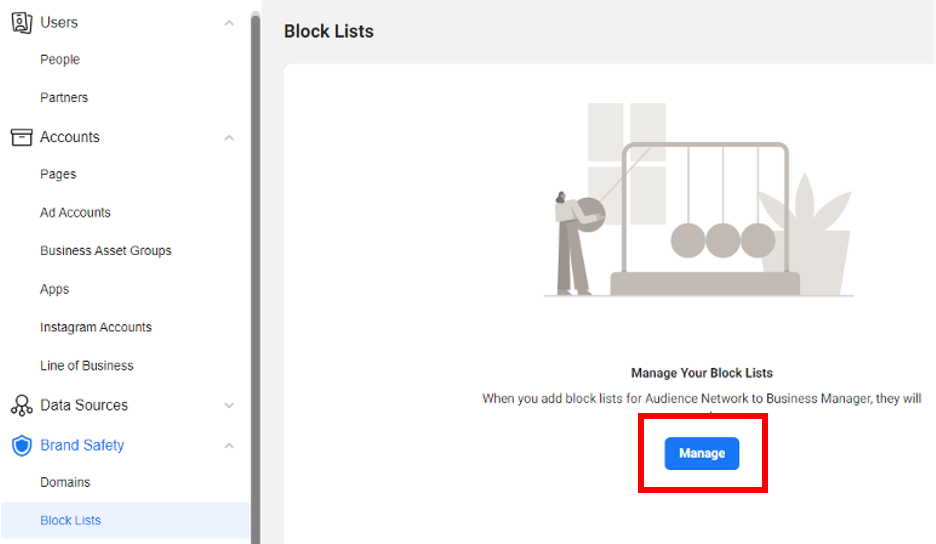
Clicking on “Manage” will take you here:
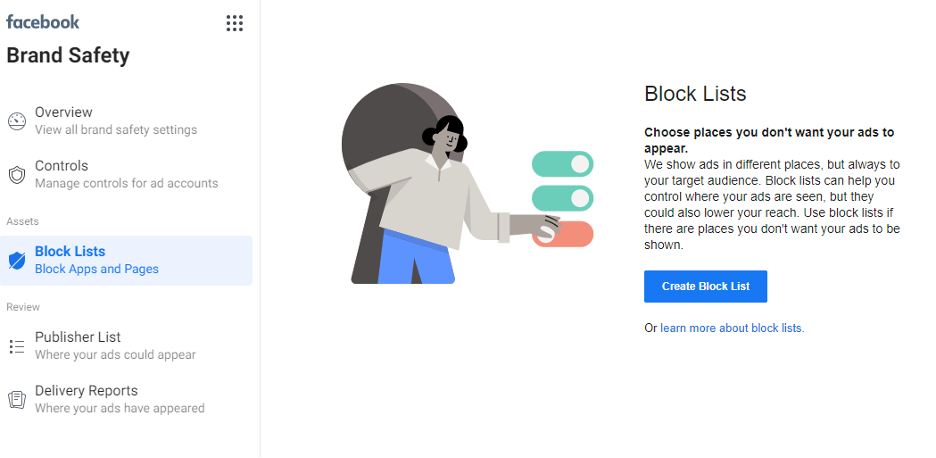
Each section of the Brand Safety platform offers its own set of controls. Let’s go through them.
Overview
In the Overview section, you’re able to see a summarized view of all your accounts and what controls you have set for each.
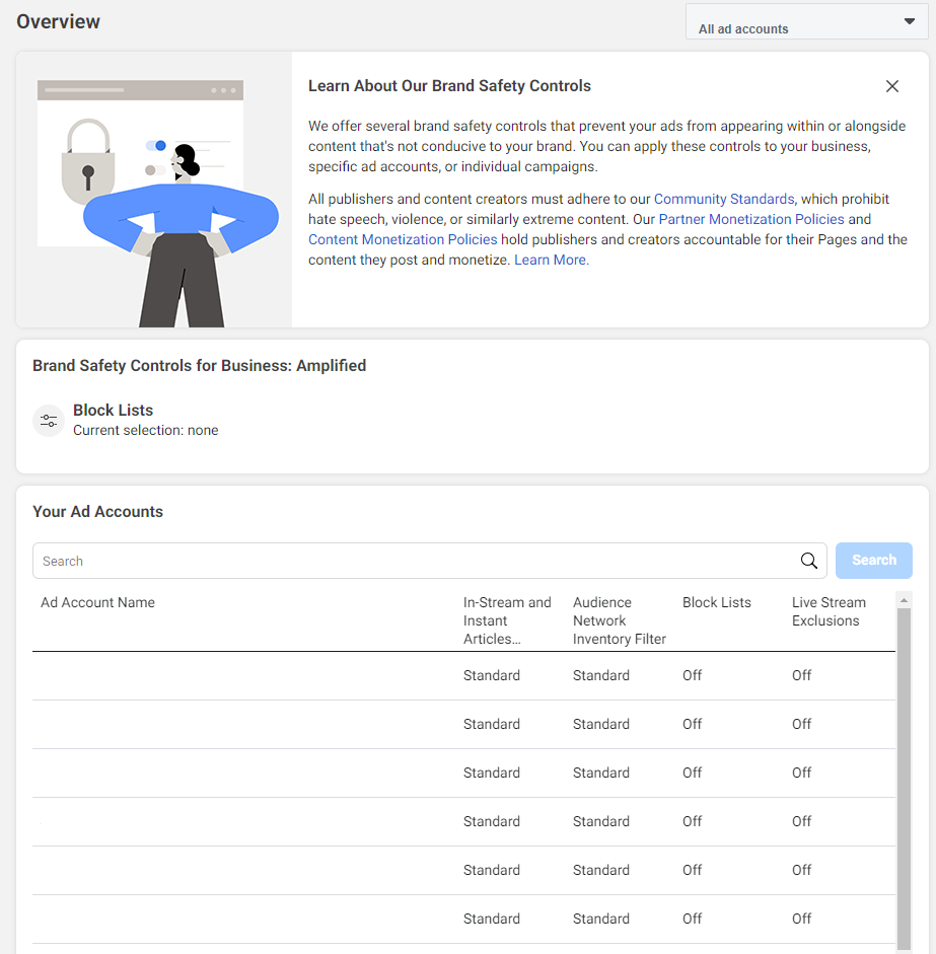
Controls
The Controls section is where you’ll apply brand safety controls to your ad account. These controls include Placement opt out, Inventory filter, Topic exclusions, Block lists, Publisher allow lists, Content allow lists, Publisher lists, and Delivery reports.
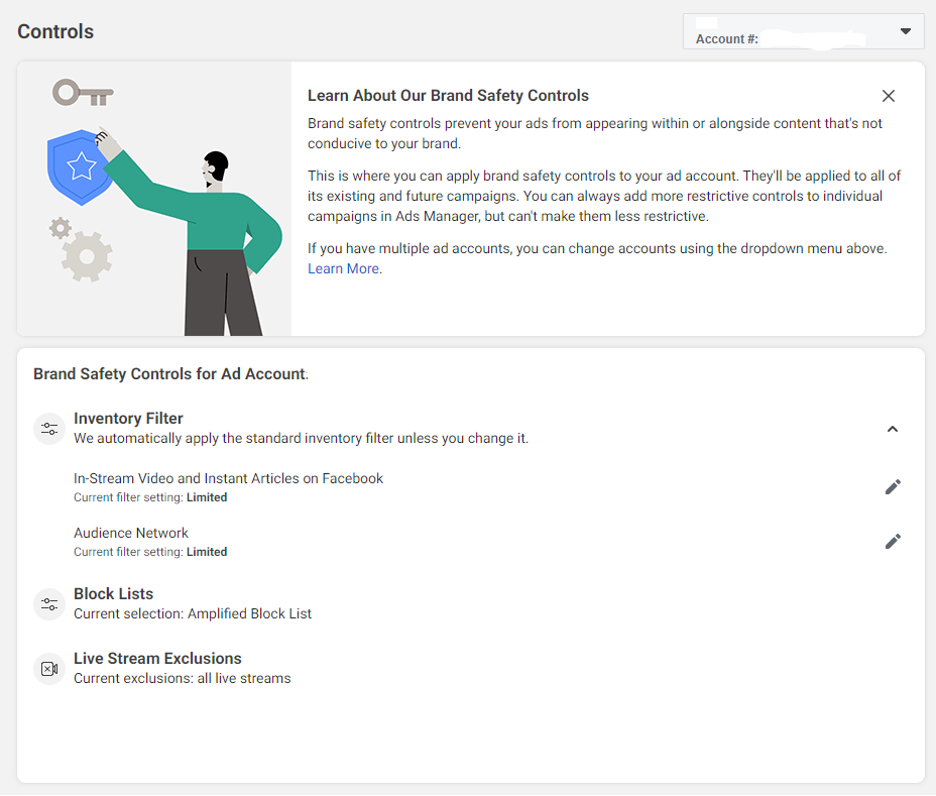
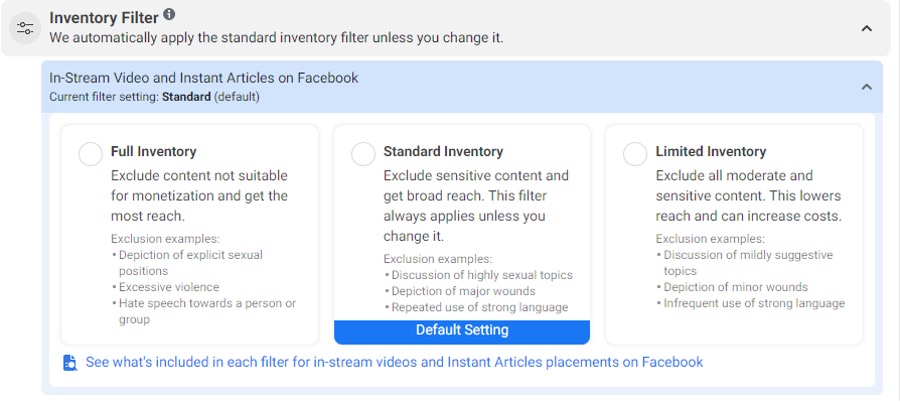
In this section you’ll also be able to control the type of content your ad appears near with Inventory Filters.
Inventory Filters are available in three tiers:
Limited inventory: excludes all sensitive and moderate content, which may lower reach and impact costs.
Standard inventory: excludes sensitive content and is the default filter for all ad accounts.
Full inventory: includes all eligible content, allowing for the widest reach.
One thing to keep in mind is the settings you select at the ad account level cascade down to the campaign/ad set level. So if you select Limited Inventory as your filter for your ad account, you won’t have the option to run on Standard or Full inventory at the ad set level.
You can be assured that Facebook is doing their best to ensure your brand’s safety with their partnerships with providers like Integral Ad Science, DoubleVerify, and OpenSlate who offer proprietary solutions to help advertisers review content options and control where ads appear.
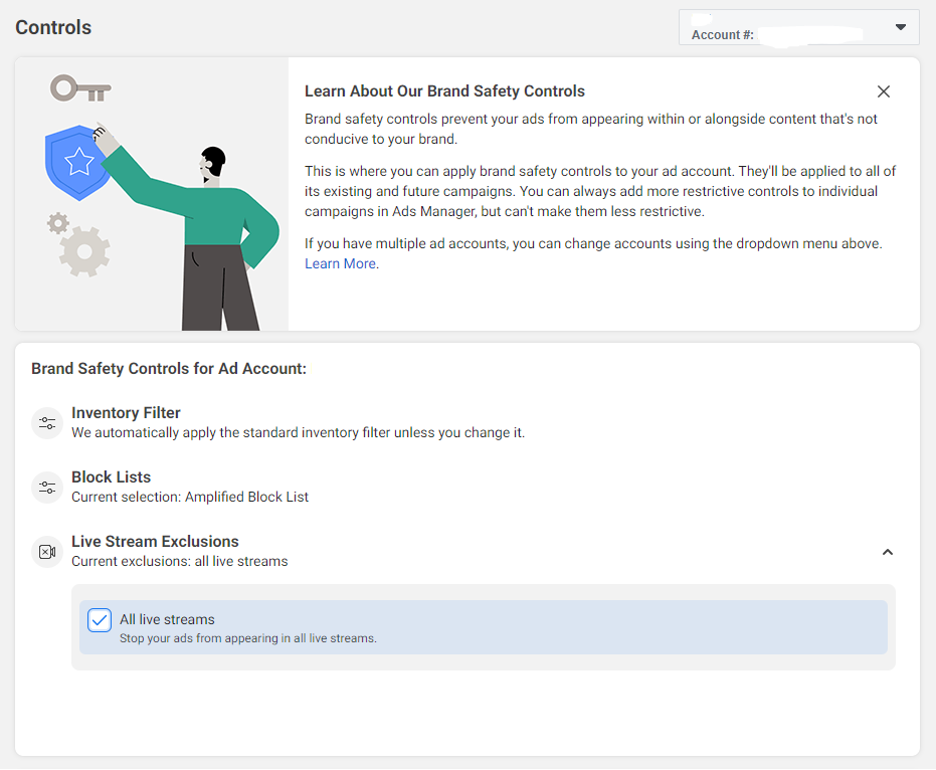
From the Controls section, you can also manage your “Live Stream Exclusions” setting – or where you decide if you want to exclude your ads from appearing during a live stream. Facebook users that stream live may choose to monetize on their content by offering up breaks between the live stream where ads show. This might sound appealing to reach engaged audiences, but it’s much harder to know what content will be discussed or shown in a live stream, making it difficult to ensure compliance with Brand Safety. Selecting the “Limited inventory” setting will automatically exclude your ads from running in a live stream.
Block Lists
Block lists may sound obvious but what are they exactly? They are csv files that list all the URLs where you don’t want your ads to appear. These URLs could include Facebook pages, websites, apps, in-stream videos, and Facebook Instant Articles.
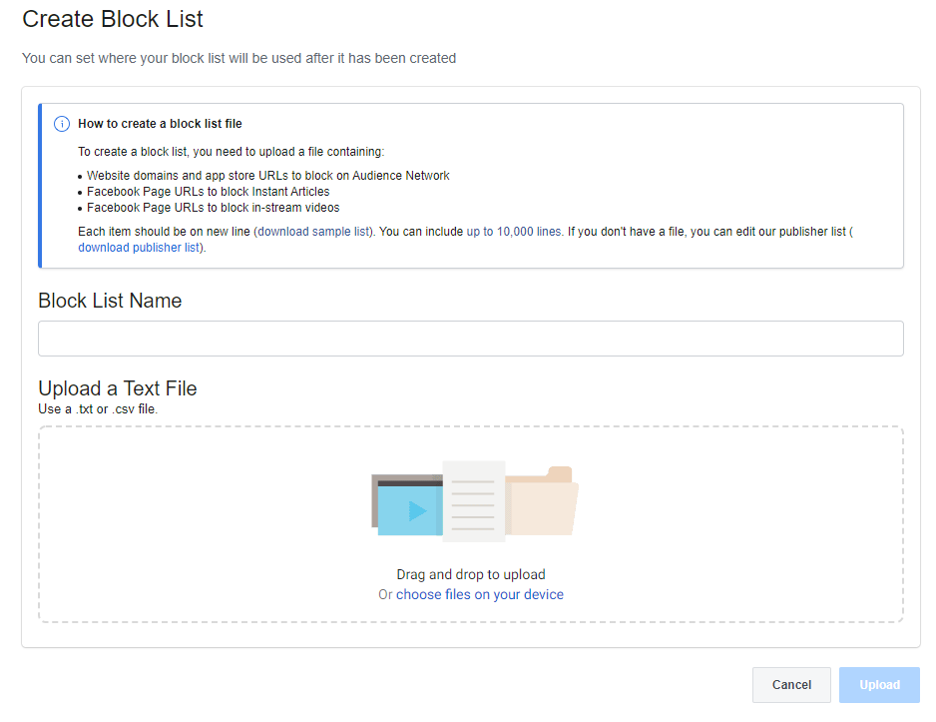
Block lists allow you to use certain placements without compromising your brand safety.
Facebook provides a downloadable block list example that is easy to edit and apply to your ad accounts. For greater convenience, your block lists can be applied to an individual account or all ad accounts at once.
Note: You can upload multiple block lists, but each can only have a maximum of 10,000 lines.
Publisher List
If you’re wondering where to start collecting URLs to add to your block list, Facebook’s publisher list is a good starting point. This downloadable list details the URLs where your ad could be placed on in-stream videos, Instant Articles and the Audience Network. We recommend scanning through the list to find any site, app or Facebook page where you don’t want your ads shown and adding them to your block list.

Note: URLs are added and removed all the time, so you should check it often. When you download the list, you’ll see whether the URL is new to the list by looking at the New to List in Last 30 Days column.
Delivery Reports
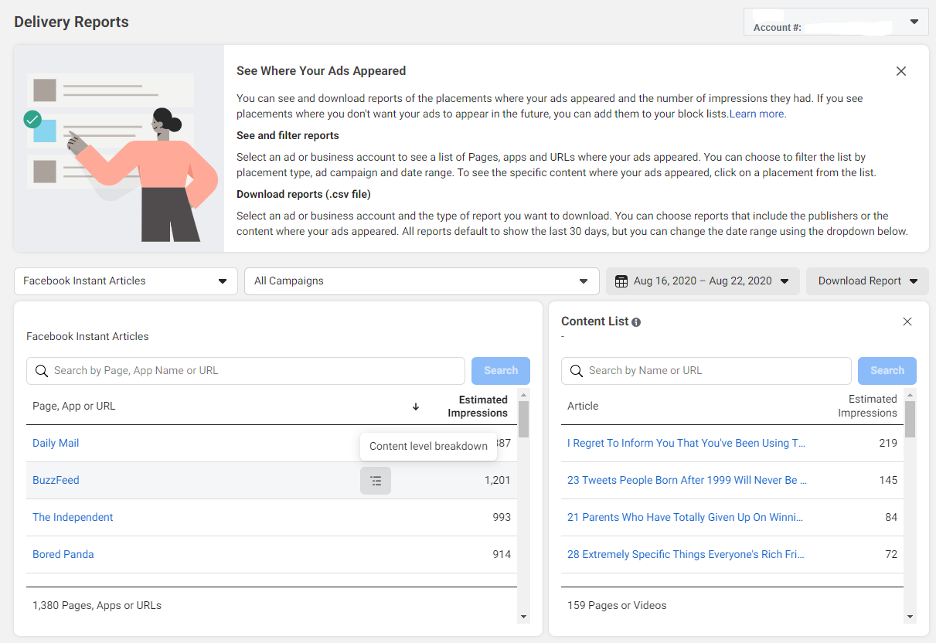
Perhaps the most interesting section of the Brand Safety tool, the Delivery Report shows you where your ads ran, down to the exact article. This list only goes back 90 days but it’s an interesting (and valuable) tool to see which articles, pages, and apps your ads were shown alongside. If you find something you don’t like, you can add it to your block list.
To get a more granular view into your campaigns you can also filter by time, campaign, and type of placement.
For most of us, being proactive about brand safety and how it appears online is a must, not merely an option. Fortunately, Facebook’s Brand Safety tools make it a painless process.
Setting aside some time to give your accounts a quick check up on a regular basis is worth preventing those potential problematic issues down the road. Don’t say we didn’t warn ya!